Saturday, August 16, 2014

Jamberry Nails

Jamberry Nail Review

We just got back from a family "vacation" to Disneyland. I had big plans to write up a blog post about all the things that allowed this to be more "vacation" than "work", three kids means that even a vacation isn't relaxing. However, that's going to be a HUGE post and I am way too tired for that tonight. PLUS when I arrived home today, I saw my Jamberry Nails in the mail!! I've been waiting for them for about 2 weeks and couldn't wait to try them.

Nail background: I used to bite my nails. For like 25 years, maybe more. When I was still biting them I often did acrylic nails, but then I would pick at them and they destroyed my nails. These days I paint from time to time, usually subtle colors since they chip hours after I finish. A few times a year I do a shellac. Usually around our National Qualifying and State Tournaments for Speech and Debate. That's when I get nervous for my kiddos and the shellac prevents me from biting my nails off. BUT, then I pick those off and it's not great for my natural nails. It's a lose lose.

When it comes to toenails, it's even WORSE!! I run a lot, so I keep my toenails REALLY short (or they dig in and cut me when I'm running). I love pedicures, but with the aforementioned three kids, there's not a lot of time for pampering. Plus, because I run, I need to keep my calluses so I don't blister, so paying for just polish seems like a waste.

Products I've Tried: I have tried a lot of the at home "peel and stick" type nails. Mostly the Sally Hansen Insta Gel Strips, and they are good, but again, I am a picker, so as soon as I see a lose edge, they are OFF!! I do like them for weddings, etc. because at least I know they won't chip. I have found them easy to use, but for whatever reason have only purchased them a couple of times.

Jamberry!

I (like many people!) got invited to a facebook Jamberry party. I love all the patterns, so I decided to bite the bullet and try them.

Pre-Impressions: These are spendy. At $15 a sheet, that's not cheap (more about this later)! Mine took about two weeks to get to me (10 business days, +2 Saturdays). I was hoping they would arrive pre-Disney, so I could test their endurance with lots of walking, but they didn't. I am not sure if you have any shipping options, but leave yourself a 2 week window if you are ordering for a special occasion.

COLORS!! There are so many color options! I did the buy 3 get one free deal, and was most excited to get the "runner" nails, because they are purple and a runner! WIN WIN!

I did the runner on just one thumb (for now). I was hoping to do these on my toes, but my toenails are too short. Maybe just my big toe!

Application: I do my own nails a LOT. That said, there was a good learning curve to these. NOT COUNTING PREP (removing polish, buffing, etc.) my toes took me over 30 min. I was completely unable to file them off. I have used the Sally Hansen ones and even with the buffer I was able to very easily get them to "finish off" on the end of my nails. FULL DISCLOSURE, I have never tried the Sally Hansen gel strips on my toes.

After the first big toe, I decided to screw the filing (which wasn't working) and just used cuticle trimmers to just cut the edges off. I also used them and some scissors to shape the strips of nails, so I am going to be able to get 3-4 applications per sheet, which TOTALLY cuts down the cost. I was originally thinking $15 per application, but now we're looking at like $4 each, which is more manageable.


Final Thoughts
After all was said and done, I think I know now what works for me and what doesn't. Because I would likely just do these on my toes, the busy patterns aren't the best (TINY TOENAILS!). I feel like the simpler pattern (the teal) looks much better than the busy one. I bought the "Fade To Black" pattern as well (the only one not shown here) and I have two thoughts about it... 1) I can't use it on my toes (the "fade" won't show) AND like the runner, I can't get 3-4 applications out of it, only two since the pattern is on each edge.

I'll have to do the fade to black on my fingernails, but I am not sure when I will get around to that! I will update for sure when I do!


 Final Results

I couldn't decide between my two patterns, so I alternated on my toes. :-)
The teal pattern looks much better on my teeny toenails where the busy pattern looks good on my big toe, but not so much on the smaller ones.

Would I buy again?

YES! I want to see how they wear, but I love all the patterns and now that I know what is going to work best and give me the most bang for my buck, I think it's a great option for me. I am running a big relay race this coming weekend, so if my toes can hold up after that, I am certain I will order some more!

I will be sure to update with wear and how long they last. I might get to that before I get to my Disney post!



Saturday, August 2, 2014

Parent Meeting = Pastry

The real reason I run is so I can eat good food with little guilt! I volunteered to host a parent fundraising meeting, really just so I had an excuse to bake. If you haven't gathered by this point, I LOVE the Smitten Kitchen blog. LOVE. I can't count how many recipes of hers I have made, and they have all been delish!

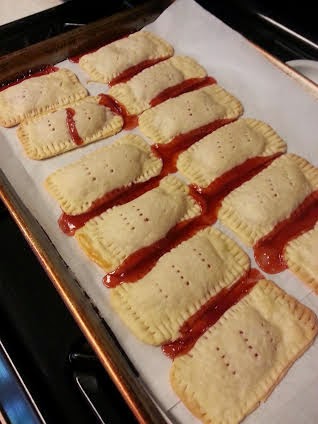
This is the second time I have attempted homemade pop tarts. Both times they have EXPLODED. Not sure if I am using too much filling, or putting it to close to the edge or what. At least they taste good, but I need to figure out a way to make them prettier!

At least you can tell they are filled with strawberry!!
I forgot to take a picture of the chocolate cinnamon rolls before we devoured them. This is what was left. They are SO good and reheat incredibly well. I kinda want to go eat another one!


Friday, August 1, 2014

Pool Party!

Party Time

Today we are headed to a pool party. Okay, not a party, it's only two families. When each family has three kids each, it's a 10 person party! My all time favorite food blog is Smitten Kitchen. I have made many of her recipes and have never been disappointed!

A few days ago she posted a Bourbon Punch recipe and I was anxious to try it. This party seemed like the perfect place. As I read through the recipe, I realized that I would be squeezing a bunch of lemons. That made me think of one of my other favs, her Lemon Cake! I always have to zest a ton of lemons, and since I wasn't using the zest for the punch, this seemed like a win, win!

Lemon Cake

I halved the recipe (or I would have eaten it all). There were a few times that I forgot to halve something, mostly the lemon juice, so hopefully the flavors turn out correctly. This photo also reminds me that at some point I need to buy better serving plates.


Bourbon Slush Punch

This one, I had just been waiting for an occasion to make! I mixed everything but the ice and stuck it in the fridge. I am hoping to pour it over crushed ice when we arrive. Our fridge doesn't have an ice maker and I didn't want to buy a whole bag just for a few cups of ice. It was perfect poured over crushed ice and I can't wait to make it again! We drank all of it, or I would have taken pictures of the finished product!


The one thing I learned while making this (and the lemon cake) is that I really need a juicer. Even just a little hand one. I am doing it all just by squeezing and it's not efficient at all!!

Monday, July 28, 2014

Stitch Fix #1

It's sad how excited I've been for this. Really sad. I signed up months ago, but there was a long wait and I wanted to get my first Fix closer to the start of the school year. I signed up to have my first Stitch Fix arrive on June 30th and it arrived today (the 28th), so an A+ for being on time. Truth be told an A-, because if it arrived on the 30th, it's closer to payday and easier to justify keeping all the clothes.

For those of you that know me, I am probably wearing the same thing every time you see me. Black pants or a black skirt, or jeans, a black and white tank top with a colorful cardigan, or a solid color tank top with a black cardigan. You can picture it can't you? Last year I went out of my comfort box at the Nordstrom Anniversary Sale and purchased (among my cardigans) a top that was "not me".
 
(shown here with the requisite black skirt, and my mad MS Paint skills)

I love it, I wear it at least once a week. I am sure my students are sick of seeing it. It made me feel like I COULD do something different and get away with it. Sadly, that didn't last long. I try to pick out clothes, but it seems like everything I buy is the same, which leaves me feeling like I have no clothes. That is at least partly true, since my surgery, almost 4 years ago, I had to replace my entire wardrobe, which would have been great if I was rich, but instead resulted in my buying a lot that was a good deal and on sale (like my $5 lucky brand jeans with flowers embroidered on them, don't worry they are in the goodwill pile). I tried to branch out, but it was always a flop followed by a good cardigan purchase... Really, I have too many (there was a cardigan on in the above photo).

This summer (if you've read any of my other posts) I started making some skirts that I was inspired to do to "shake up" the cardigan forest. Then, one of my friends online posted about Stitch Fix. It seemed to good to be true. Sure the clothes would be more expensive, but if they fit and I felt good, it was a win win. So, I've been on pins and needles for MONTHS waiting for the box to arrive.

I opened it and thought...
Really? I don't do gold. I was VERY clear that I don't do gold. At that point I was sure this was all going to be a waste, but I talked to myself (as I often do) and decided to try everything on, just so I could write this post. I also told them that I love dresses, but don't often do dresses since I am two sizes larger on top.

First things first, I looked at what I had. Despite the gold buttons, everything else was very me and that made me happy. There was a nice note attached that showed me how I could wear things and that the stylist picked the dress because she thought it would flatter me. (we'll see)


I was immediately drawn to the dress, so I decided to try it on first. I loved it, but my first thought was IT'S SO LOW CUT. Yikes! I love the fabric, love that is has pockets. It is (SHOCKINGLY) the right length and cute... But, my damn boobs.


without a cami
with a cami

Despite the cuteness, I hate that I'd have to wear something under it and it still makes me feel SUPER busty. I am on the fence about keeping it.

Then I decided to go for the gold (pun intended) and try on the blue top with the black pants they sent. I have two pairs of black pants at the moment, well three, but one is a slight bootcut and requires heels. I have black skinny jeans and a basic black dress pant.

Wait a min, this doesn't suck! It's also something I would have NEVER taken into a dressing room much less actually purchased. I was shocked, in a good way. I was so stunned, I didn't change my shoes, which WAY don't match the top. I took a moment and thought. Hmmmm, I have some cute boots I bought on 6pm, I wonder how they would look. Not bad, I might be able to pull this off. Maybe these people DO know what they are doing!
With the boots!
With my own black jeans


Okay, this could work! On to the next top!

With the pants they sent
I knew this was a keeper from the get go. Perfect for me, not really outside the box at all, but it's cute and comfy. I kept the black pants they sent on and then decided to try the top on with my pants... MISTAKE, now I want to keep the pants!


I wear black pants to work a lot, so I am debating keeping the pants. The looser leg ones still have the tags on them and were purchased a few weeks ago, so they could still be returned. That said, the ones I already bought are HALF the price of the ones they sent. So even if they are cuter, are they twice as cute? (With this top yes, but I think the black jeans look good with this top, so they are very much NOT a need).

looser leg does NOTHING for my shape!

Then I just second guess myself on everything. I have like 4 grey and white striped tops (though, only one grey and white striped cardigan... not a joke there folks). Nothing this shape, but it's not really out of the box for me. UGH! I have three days to decide what to keep. There are also some hoop earrings that I am wearing in most of the photos.

What to keep?

Beaded Hoop Earrings - $42 (return, I have like a $20 limit for silver earrings)
Grey/White Stripe Top - $48 (on the fence)
Wrap Dress - $58 (pretty sure it's a return)
Blue Blouse - $58 (this might be a keeper)
Black Pants - $88 (ugh, if they were sub $50 they would be a keeper)

So, help me out here. I have a $20 styling credit to apply to the order (or, the black pants are only $68!). If I buy all 5 items I save 25% off the total (that's not going to happen). What do I keep?

Sign up for your own Stitch Fix, I get a credit that can help me justify buying these black pants and you get some awesome items picked out for you. Win win :-)


Saturday, July 26, 2014

Elsa Dress!

Elsa Dress


My daughter was invited to a "princess party". Despite being a 5 year old girl, we are lacking in the princess dress department. We have a two year old Rapunzel dress from Target that's coming apart. I asked her what she wanted to wear and she said, maybe you could make me an Elsa dress?

I saw that coming a mile away, and had already started looking for online tutorials. There wasn't ONE that really worked for me, but I saw a lot of photos and decided it would be easiest to make the top with a shirt overlay and just a separate skirt. Oh, and a cape... a long cape.

I think it took longer to fabric shop with a 5 year old than it did to make everything.

I purchased a short sleeved shirt with rhinestones from Kohls to use as the top base.
From there, I cut the shiny blue material in a sweetheart design to attach to the shirt.


I wrapped the shiny blue around the shirt and just sewed it along the top and bottom.
She wanted a dress, not a shirt and skirt, but I wasn't sure the shirt could handle the weight of the skirt fabric and the cape she wanted. In the end, it was two separate pieces.


She didn't seem to mind that it was two pieces.
The cape is almost 2 yards of fabric so it would be long as requested :-)
I attached the cape to the shirt with Velcro so it could be removed if and when she got sick of it.


Box Pleat Skirt

Black and White Box Pleat Skirt


I always have big dreams of skirts, but am short and things never fit right! Since the advent of Pinterest, I can't help but dream of all the awesome things I could attempt to make. I quilt a lot, but don't do a lot of clothing. Enter the Box Pleat Skirt...

Box Pleat Tutorial

One of the many tutorials I found, this one seemed the most straight forward and easiest to follow. I read through all the directions, read all the comments and decided (against my better judgement) to attempt something with a zipper!

I purchased the same Ikea Fabric. As a shorter person (5'2"), I purchased 3 yards for my waist, but had enough for two skirts because of how wide the fabric was/is.

So many pins!
 For every pleat, there's 9" of fabric, so you'll be dealing with a LOT of fabric.


Longer length
 Pin before you hem!! I was tempted to take off two stripes worth. That would have been indecent. Much like curly hair, the shorter it is, the more it sticks out rather than laying straight. In the end I only took off the bottom stripe and as you can see in the final photo, it seems much shorter than that.

I really hate zippers
I didn't even want to post this photo, since it looks so bad.
Things I would have changed... Make the zipper closer to the pleats, 
and maybe just embrace it and try and exposed zipper.

Final Result!

Friday, July 25, 2014

Tulle Skirt!

Tulle Skirt

Perhaps it's having a young daughter who always wears a tutu over EVERYTHING, but I have been wanting a classed-up version of a tulle skirt.

Since I am not creative when it come to designing patterns, I found this tutorial:
Simple Tulle Skirt Tutorial

I bought all my fabric online and was so excited when it arrived. I bought enough fabric to make two skirts, one in grey and one in purple.

I started by taking some of my kids butcher drawing paper and making a pattern. The hardest part is trying to line up the tulle. It folds easy and is a nightmare to pin. Including pattern making, the whole grey skirt took under 2 hours. I was tired of fighting tulle and elastic, so I decided to wait to the next day to make the purple one. My mistake. My husband thought the paper was recycle and crumpled it up to recycle it. That's why it's not in pristine condition in these photos!

The grey was FABULOUS, but I decided I wanted the purple to be a bit longer. Let's be honest, I didn't want to make a second pattern. that was a mistake. Between just trying to add (visually) an inch around the pattern and the now-messy nature of the paper, it wasn't even. I need to work on that.

My daughter has a "princess" birthday to attend this weekend, and I am going to wear the grey skirt, as she believes it best matches her Elsa dress!

Materials Needed


I purchased the materials according to the tutorial.
7 yards of tulle, a yard and a half of knit and some 2" elastic
(I think I bought like three yards, knowing there would be extra for other skirts)

Because I am lazy, I purchased a knit so I wouldn't have to hem anything. That was the rec of the tutorial I used, and she was right. In the end you only sew two things. Once to connect the elastic ends together and once to attach all the fabric to the elastic. SUPER simple!


Pattern along the fold of the knit fabric

You can see the pattern is a little worse for wear after my husband attempted to recycle it.
You want to place the pattern along the fold of the fabric so you only have to cut once for a full circle.


Have you ever tired to pin tulle?!
Seriously, tulle is a pain to work with. It's slippery and full of holes!
I used my quilting clips (really hair clips) rather than pins to hold all the layers together.

 
This is what you should end up with. A circle folded in half


Here are all the layers clipped together

Final Results!
 This is the grey version. The purple version is just a bit longer.

Try It Yourself!